
Processing入門講座の第6弾は、ロッカースイッチを描いてみようです。なんでかはみんなもわかると思うけど、電子工作で使うから。Processingで前回はプッシュボタンを作ったがロッカースイッチでオンオフするのも作ったらカッコいいと思ったからです。
Processing入門講座 第6弾 ロッカースイッチを描いてみよう
このProcessing入門講座の第6弾は、ロッカースイッチを描いていきます。今までに、四角形や線、丸の書き方を学習してきました。今回、それらを上手に使いロッカースイッチを描きたいと思います。早速、Processingを起動しましょう。
processing プログラム ロッカースイッチ
Sw Sw1 = new Sw(20,55,90,150,0);
Sw Sw2 = new Sw(150,80,120,200,0);

int stat;

void setup() {
  size(500, 500);
  Sw1.display(Sw1.st);
  Sw2.display(Sw2.st);

}

void draw(){
}

void mousePressed(){

    if (Sw1.areachk() == 1)

        if (Sw1.st == 0){
          Sw1.st = 1;
        } else {
          Sw1.st = 0;
        };

    if (Sw2.areachk() == 1)

       if (Sw2.st == 0){
         Sw2.st = 1;
       } else {
         Sw2.st = 0;
       };
     Sw1.display(Sw1.st);
     Sw2.display(Sw2.st);
}

class Sw {
  int x, y, w, h, st;
  Sw (int xpos, int ypos, int wsw, int hsw, int sta) {
    x = xpos;
    y = ypos;
    w = wsw;
    h = hsw;
    st = sta;
  }

  void display(int stat){

    noFill();
    strokeWeight(2);

    int col_top;
    int col_right;
    int col_bottom;
    int col_left;

    int col_intop;
    int col_inmidup;
    int col_inmidlo;
    int col_inbo;

    col_top = 230;
    col_right = 100;
    col_bottom = 80;
    col_left = 190;

    if(stat == 0){
      col_intop = 200;
      col_inmidup = 100;
      col_inmidlo = 170;
      col_inbo = 160;
    }
    else {
      col_intop = 160;
      col_inmidup = 170;
      col_inmidlo = 200;
      col_inbo = 100;
    }

    stroke(0, 0, 200);   // center
    fill(col_top);

    rect(x,y,w,h);

    noStroke();
    fill(col_top);
    quad(x-10, y-10, x+w+10, y-10, x+w, y, x, y);   // top

    fill(col_right);
    quad(x+w, y, x+w+10, y-10, x+w+10, y+h+10, x+w, y+h); // right

    fill(col_bottom);
    quad(x+w, y+h, x+w+10, y+h+10, x-10, y+h+10, x, y+h); // bottom

    fill(col_left);
    quad(x-10, y-10, x, y, x, y+w, x-10, y+h+10);   // left


    fill(col_intop);
    rect(x+10,y+10,w-20,15);

    fill(col_inmidup);
    rect(x+10,y+25,w-20,(h-20)/2);

    fill(col_inmidlo);
    rect(x+10,(y+h/2),w-20,(h-20)/2);

    fill(col_inbo);
    rect(x+10,y+h-25,w-20,15);

    stroke(0);

    ellipse((x+(w/2)),y+15 +(h/4),15,15);

    line(x+(w/2),y+(h/2)+10,x+(w/2),y+h -30);
    line(x+w-10,y+10,x+w-10,y+h-10);
    line(x+10,y+h-10,x+w-10,y+h-10);

}

  int areachk(){
    if(mouseX > x+10 && mouseX < x+w-10 && mouseY > y+10 && mouseY < y+h-10){
      return 1;
     } else {
      return 0;
     }
  }
}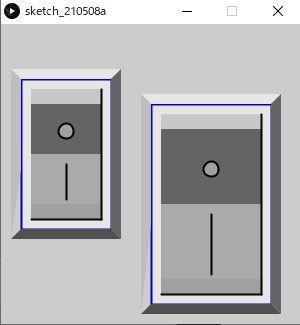
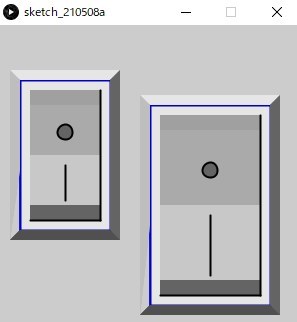
極端に小さいものや幅が狭いものなどは各自調整をしてみてください。画像が崩れることもあると思います。
Sw Sw1 = new Sw(20,55,90,150,0);
Sw Sw2 = new Sw(150,80,120,200,0);
今回は上記二つのインスタンスを生成してみました。
プログラム的には以前のものとほとんど同じです。描画するものがプッシュボタンから、ロッカースイッチに変わっただけです。マウスを押した後のリリース命令を無くしています。
座標の求め方が混乱して旨くできませんでした。座標の求め方等ご指摘していただければ嬉しいです。
以下のサイトを参考にさせていただきました。
コメント